

Each type of smoker has its unique characteristics. Masterbuilt Propane Smokers are not free from unique traits.
Some of these traits can be on the downside, but most can be beneficial. Knowing ahead of time can save you a learning curve and prevent trial and error on expensive food.
In this article, you will learn how to use a propane smoker by exploring all the essential aspects of the Masterbuilt Propane Smoker.
Note: most links in this article are Amazon.com Affiliate links, see Affiliate Disclosure, thank you.

What type of Smoker is the Masterbuilt Propane Smoker
Most propane smokers are vertical-style smokers, which refers to the flow of smoke and hot air. The heat source is located near the bottom center of the vertical smoker. In our case, this is a propane burner, but it can be an electric element in other smokers.
The shape of the Masterbuilt Propane Smoker is that of a rectangular box standing on its end. Many times vertical smokers are referred to as a mini-fridge.
The main advantage of this shape is you can load a lot of food inside the smoker. One disadvantage that stands out is the lack of being able to get a crispy crust or searing.
The smoker we will be using for testing and photos is the Masterbuilt MPS230.
Click here for our Review of Masterbuilt Propane Smoker
How to operate a Masterbuilt Propane Smoker
After you have followed the assembly instructions, your smoker should be ready to use. Connect your propane tank and look for leaks. If you wait five minutes, you should be able to smell any leaking gas, or you can test it with soap and water.
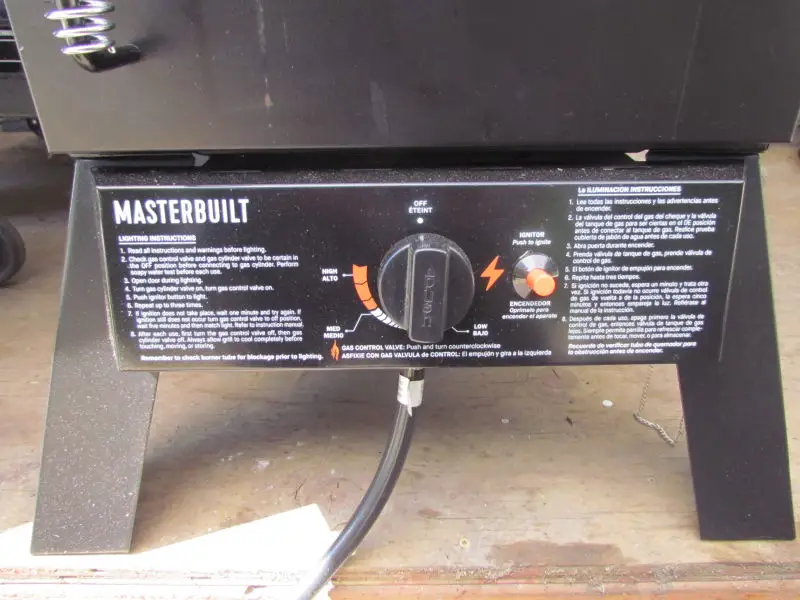
Before you start your smoker for the first time, remove the flame disk bowl and the water bowl(pan). Turn your propane tank to open fully. Turn your smoker’s control knob halfway, and within 5 seconds, press the igniter button.
If your smoker doesn’t start, press the igniter up to 3 more times immediately. If your smoker has not started, turn the control knob to the off position, open the smoker’s doors, and wait 5 minutes before trying again. If your smoker doesn’t work at that point, you may have an issue that needs a professional.
After your smoker is lit and burning consistently, carefully reinstall the flame disk bowl and the water bowl. Adjust your control knob to your desired setting to set your cooking temperature.
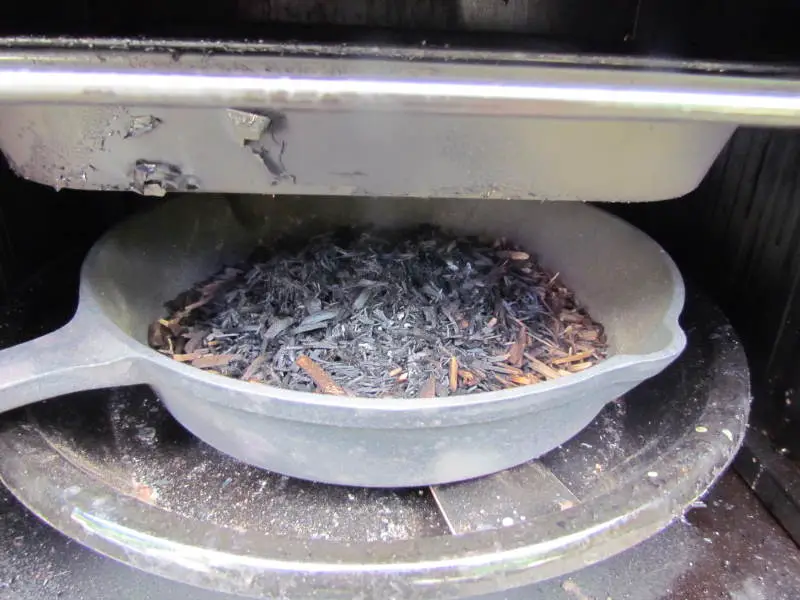
Note: the user’s manual calls for adding woodchips to the flame disk bowl. In our experience, doing so will cause the wood chips to catch on fire rather than smolder and produce smoke. You can purchase an 8 to 10-inch cast-iron pan to set inside the flame disk bowl to reduce the chance of flare-ups.
Seasoning your Masterbuilt Propane Smoker
Before you cook in your smoker, you need to season your Masterbuilt Propane Smoker. Cover all surfaces inside the smoker lightly with vegetable oil spray or canola oil spray, except the burner.
You can use other oils; for detailed information on those, check out our article. Add a second coat of oil to the roof of the cooking chamber because this will make it easier to clean.
Run your smoker at 350 degrees for three or more hours, just as if you were cooking something. Try to avoid going above 350 by slowly turning up your temperature dial every 10 minutes.
Add half a pan of wood chips to the smoke on the hour for the first three hours. After the smoker has cooled, respray it with a light coat of vegetable oil.
To complete your smoker seasoning for your first cook, try something fatty like a pork roast. When you cook fatty foods in your smoker for the first cook, you will be rewarded for this effort with delicious-tasting smoked food in the future.
If you are in a hurry, cover the inside of your Masterbuilt propane smoker with vegetable spray and run for an hour at 375 degrees. Keep the smoke flowing as much as possible during the first 45 minutes. Watch your wood chips for flame-up. Burning wood chips will give your smoker a burnt taste.
For more details check out our article How to Season a New Smoker and Why You Should Do It
Preparing your Masterbuilt Propane Smoker
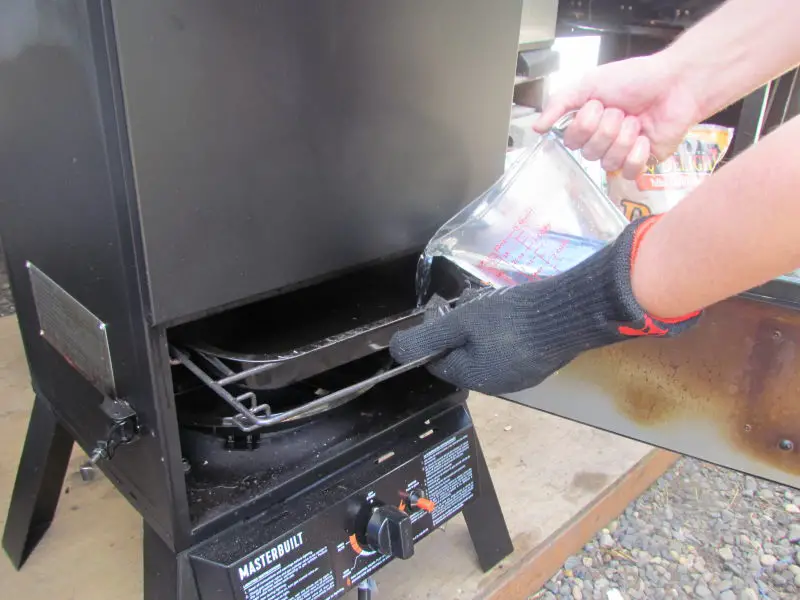
There are some basic steps you can take to prepare your propane smoker for your day of cooking. Many people like to add hot water to the water bowl. Using hot water will prevent temperature drops and increase humidity in your smoker almost instantly.
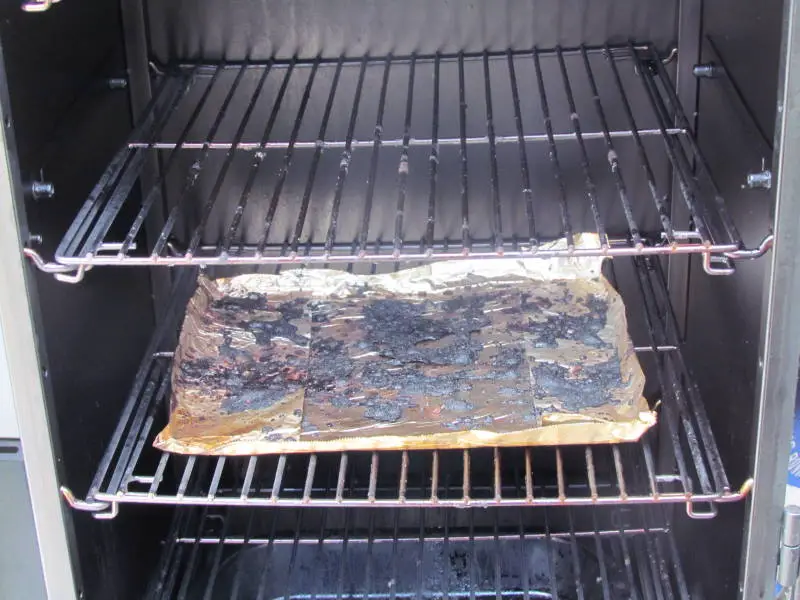
Placing a tray on the bottom shelf of your smoker is a great way to make clean-up easy after your meal is cooked. Make clean-up even easier by using a disposal cookie sheet or creating one out of foil. When your foil tray is dirty, you can toss it in the trash.
Preheat your smoke for up to an hour, so the metal frame is at your desired temperature. When you place your food inside a preheated smoker, the temperature will recover fast than if you just started your smoker. Also, while preheating your smoker, add a small number of wood chips to wake up the seasoning in your smoker.

Loading wood chips in your Masterbuilt Propane Smoker
Traditional vertical smokers use a pan that you fill with wood chips and on top of a burner. The Masterbuilt propane smoker has a separate door at the bottom of the smoker for loading wood chips.
There is a part called a flame disk bowl that the user manual instructs to put wood chips in for smoking. Many users complained that the wood chips catch on fire using that method, and our tests confirm this problem. The simple solution to flame up is to add an 8 to 10-inch cast-iron frying pan to your smoker.
Cast iron pans are durable and excellent at distributing the heat evenly so you can produce consistent smoke. Another benefit of using a pan is loading wood chips. Using high-temperature gloves, you can reach in to remove or insert the pan in the smoker.
Many people say that adding wet wood chips to the flame disk bowl will prevent flare-ups, but in our tests, once the chips dried, they instantly caught fire. Also, the performance of wet wood chips is hotly debated, so we avoid using them.
When the smoke output of your smoker has slowed, it is a great time to reload the wood chips and restore full smoke flow for the best flavor. Be careful not to use too much smoke, or you could end up with bitter food.
Check out our article All About Wood Chips
Loading Food in your Masterbuilt Propane Smoker
Starting from the upper shelf, pull the shelf halfway out. Arrange your food as close to the center as possible. Use care to place food without touching other food or the sides of the smoker. Then move down one shelf and repeat the process until all your food is loaded or your smoker is full.
It is easy to load your propane smoker following the simple instructions above. But we think you can take it to the next level with a few tips.
When you start loading your smoker, locate the shelf as close to the thermometer as possible. Doing this will allow you to understand better the actual temperature where the bulk of your food is located.
Grill mats can make your smoking process more manageable in a variety of ways. Multiple mats can be loaded in the kitchen on a cutting board then slid on the shelves in your preheated smoker.
When finished smoking your food, transfer it to a cutting board or serving tray. Brush off the grill mat, rinse them, and place them in the dishwasher.
Load the thickest or largest cuts of meat near the top of the smoker. Most smokers are hotter towards the top, which will help the different size pieces of meat cook evenly. You can test this by placing two dozen store-bought biscuits in different locations, then see which ones burn first.
If you use a wired probe, insert it in the thickest piece of meat after you load all your food. Try to route the wire along the hinge side of the smoker. If you can, run the wire out the bottom of the door to keep the seal tight.
Setting your Masterbuilt Propane Smoker
To set your smoker temperature, after lighting, set your control valve to a where the red and white markings meet. Wait 10 minutes for the propane smoker to preheat and check the temperature.
Adjust the control valve in small turns in the desired direction, clockwise for hotter and counterclockwise for cooler. Wait for 10 minutes and repeat until you are 5 degrees above your target cooking temperature.
When you load your food, it is normal for your propane smoker to drop in temperature, so repeat the adjustment process. Also, watch for temperature changes when adding wood chips.
Adjusting the temperature is truly one of the advantages of any digital type smoker. If this is an issue for you, we suggest going with an electric smoker.
Accessories for your Masterbuilt Propane Smoker
There are no accessories included with the Masterbuilt Propane Smoker. However, the available options are limitless.
Cast iron pan – We call a cast iron frying pan an accessory, but it is more of a must-have. The flame disk bowl is more of a design flaw than an asset. However, simply by adding a generic 8 to 10-inch cast-iron pan, you can get the most out of your smoker. We purchased a cast iron pan called Gibson Home GSA, and another brand name option is the Lodge brand.
Cover – To prevent rust and other environmental damage, a cover is a great idea. There are covers made by Masterbuilt or generic covers in the perfect size.
Stand – Lifting your smoker a foot or two off the ground is an excellent idea because it can be a back saver. You can make a platform with a 2×8 and a small piece of plywood, or you can do like we do and use a cart. Either option works great, and the cart gets the smoker high off the ground, so the smoke stays out of your face.
Smoke generator – One of our top accessories for smoking is a pellet smoke tray. We have a brand that we are fond of, but since they are not mechanical, they should all work about the same. True smoke generators a very nice because you load them with fuel and flip the switch. Be careful not to overfill the smoke generator and check it often.
We have a complete article, 11 Accessories to Buy with Your New Smoker
Masterbuilt Propane Smoker tips and tricks
This section will cover some tips to answer some common questions and help you get a good start on your smoker journey. Additionally, we will detail some of the topics we covered earlier to help you with some fine-tuning.
How often do you add wood chips to Masterbuilt Propane Smoker?
A good rule is to add wood chips once an hour. But, if you see your propane smoker has stopped smoking before one hour, you can reload the wood chips.
After you get a bit of practice, you will have a better idea of how long wood chips will smoke. Don’t forget that your cooking temperature makes a difference. The hotter you smoke, the fast the wood chips will be used up.
How do I add water to the Masterbuilt Propane Smoker?
Take a glass measuring cup and fill it halfway with hot water. Add the water right after you light your propane smoker and before you load your wood chips. This will prevent you from accidentally spilling water on your wood chips but keep the water warm.
Adding more water during the cooking process can be difficult. Pull the water pan holder out just far enough to add water, then slowly push it back in.
Can I use a smaller wood chip pan in my Masterbuilt Propane Smoker?
It is possible to use a smaller pan, like a 6.5 inch, but you will only want to do so when cooking at lower temperatures. At high temperatures, the flames tend to go over the edge of the pan and ignite the wood chips. If you plan on smoking at lower temperatures, Lodge makes an excellent cast iron pan that you can find on Amazon.com.
How do I make a disposable drip tray for the Masterbuilt Propane Smoker?
Lay a piece of heavy-duty foil out that is about 4 inches larger in each direction than a smoker grill grate. With the grate centered, fold each side straight along the edges of the smoker grate. Remove the grate from the foil and roll the foil down on each side to firm up your disposable tray.
Another way to make a tray is to find a box that fits inside your smoke. Wrap a piece of foil on the bottom. One of the boxes that came in your smoker makes a great template.
How do I clean my Masterbuilt Propane Smoker?
Clean your smoker with hot water, dish soap, and a rag. Take your rag and wipe the inside roof of your smoker, then the inside of the door. Finally, remove the grates and use a coil brush to remove any loose matter.
If you have mold inside your smoker, consider putting half apple cider vinegar and half water in a spray bottle. Spray the entire surface of your smoker and wipe it out with a rag. After your smoker is clean, you will need to season your smoker.
If you can avoid deep cleaning your smoker, your food will taste better.
Read our article What to Use Instead of a Wire Grill Brush?
How do I clean my Masterbuilt Propane Smoker Grates?
As mentioned in the last section, brushing the loose matter off your greats after each use is a “must-do.” For the most part, it is easy to clean your grates while they are still warm.
With a sheet of foil or a disposable foil pan on the bottom shelf starting with the top shelf, use a coil brush to remove all the debris. Work downward cleaning each shelf until most of the debris is in the tray, then discard the tray.
If the grill grates are past the point of brushing them off, then remove them for cleaning. First, brush all the shelves as clean best as possible to remove loose debris.
Then scrub each grate with hot water and dish soap, like Dawn dish soap. Place the grates in the dishwasher for a full cycle. When complete, run a quick seasoning after reloading them in your smoker.
Finally, If you are not using a shelf, remove it. Removing a shelf from your smoker can prevent the shelf from getting dirt. When you are done smoking your food, it is easy to swap out the dirty shelf for cleaning.
Using Grill mats can cut back on your cleaning. While you will still need to clean your grill mats every use, the grill grates tend not to get much debris and maintain their seasoning for the best flavor.
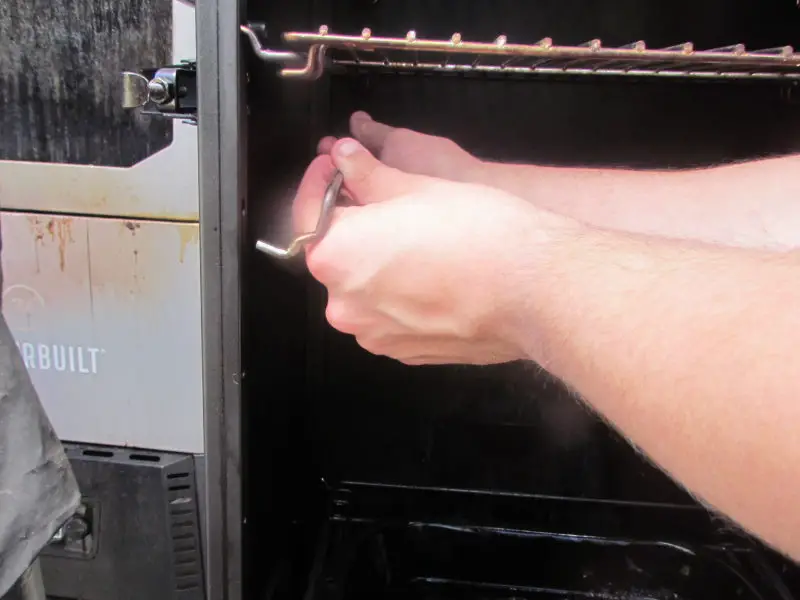
How do I adjust my Masterbuilt Propane Smoker Grates?
Adjusting the shelve in your propane smoker is done in the same way as inserting hooks in a pegboard. You can insert grate supports at a slight angle in a set of holes that match your desired shelf level.
With the MSP230, start by placing the first set of cooking grate supports in the fuel area to support the water bowl holder. Add the next set of cooking grate supports in the bottom set of holes.
For the rest of the supports, move upward, skipping one set of holes so each shelf will end up evenly spaced. Using this method will give you a great starting point for your smoking.
If you have a meal you wish to cook like a beer can chicken, you can remove the top shelf and have the perfect amount of room to place your chick upright.
My Masterbuilt Propane Smoker is not smoking
There are two primary reasons you smoker might not smoke, your flame is too low, or your wood chip pan is dirty. If your Masterbuilt propane smoker is above 170 degrees, your flame should be good.
If your flame is low, you could have an empty propane tank or a clogged orifice. You could try compressed air to blow the clog out in reverse. Disconnect all your fuel line parts and force air through each piece backward.
If your pan looks crusty, brush it out or scrape it if needed.
My Wood Chips are Catching on Fire in my Masterbuilt Propane Smoker
There are two main reasons wood chips flare-up, running at too high a temperature or using the flame disk bowl.
If your wood chips go above 450 degrees, they will almost always catch on fire. By keeping your smoker below 350 degrees, you can avoid heating your wood chips to a combustion temperature.
The one design flaw that we have found with the MPS230 is the flame disk bowl. The vent system allows the flames to come in direct contact with the wood chips. Once that happens, there is no way to prevent your wood chips from catching on fire.
The simple solution to this problem is to add a 10 inch cast iron pan to your smoker. If you use this pan to burn your wood chips, they will be isolated from the direct flame.
Check out this amazing recipe video
Masterbuilt Propane Smoker Line-up
Masterbuilt makes a large variety of smokers from different fuel sources to different sizes. Most smokers of one fuel type operate in the same manner. In this article, the photos, testing, and details are for the MPS230 smoker. We have put together a list of other smokers for your convenience working from largest to smallest, with some details.
Masterbuilt MB20050614 Propane Smoker 44-inch

Click here to see on Amazon.com
Features
- 44-inch cabinet height
- 2 doors
- Includes 4 adjustable racks
- 100 pounds capacity
- 6.5 cubic feet of cooking capacity
- Two 8250 BTU burners for a wide temperature range
This smoker has a massive capacity and a great temperature range. A smoker this size is not exactly portable, but it would fit in well if you have a toy hauler. Finally, at the time of this article, it was limited in availability.
Masterbuilt MB20051316 Propane Smoker with Thermostat Control 40 inch

Click here to see on Amazon.com
Features
- 40-inch cabinet height
- Glassdoor cooking chamber
- 2 doors
- Door held wood chip pan
- Includes 4 adjustable racks
- 961 inches of cooking surface
- Thermostat controlled
- 15750 BTU burner
When you use a propane smoker, the biggest issue is temperature control, but not with this smoker. Masterbuilt has designed and patented a thermostat control and a safety shutoff that we have not seen on any other smoker. We have little to complain about this smoker; however, it is no portable.
Masterbuilt MB20050716 MPS 330g Propane Smoker, 30 -inch

Click here to see on Amazon.com
Features
- 44-inch cabinet height
- Glass door cooking chamber
- 2 doors
- Door held wood chip pan
- Includes 4 adjustable racks
- 713 inches of cooking surface
- Thermostat controlled
- 15750 BTU burner
This smoker Is where you start to get the best balance of thermostat features and size. Weighing in at roughly 76 pounds, you can toss this smoker in your camper or your boat for your camping trip. The Thermostat controlled temperature is excellent and is rated for 57 hours of operation on low.
Masterbuilt MB20050116 MPS 20B Patio-2-Portable Propane Smoker

Click here to see on Amazon.com
Features
- 1 doors
- Includes 2 adjustable racks
- 100 pounds capacity
- 5000 BTU burner
- Mini propane canister compatible
Look no further if you are looking for a truly portable smoker that can double your camp oven. For small trailers like pop-ups or teardrops, this unit is perfect. Coming in at 23 pounds, it doesn’t get more portable. However, you will have difficulty putting more than two racks of ribs inside or one large chicken, but if you are traveling light, you may only need one small chicken for your dinner.
Summary
A propane smoker is an effortless method for cooking meats such as ribs and chicken. Utilizing a Masterbuilt propane smoker, such as the MPS230, is a straightforward process.
We have aimed to provide you with a comprehensive beginner’s guide that will address your queries and enhance your smoking skills. Additionally, we offer a plethora of articles, including “Beginner Smoker Tips and Tricks for Maximizing Your Results,” which provide general tips for achieving optimal outcomes in any smoker type.
Our intention is to assist you in becoming a proficient smoker, ensuring that your culinary endeavors are both enjoyable and successful.
See the Masterbuilt MPS230 on Amazon.com