

Smoking is one of the best ways you can flavor your chicken. However, there is always a chance you can dry your chicken out. But with the Masterbuilt gravity series you can make a moist smoked whole chicken.
The best way to get moist chicken is by using a beer can to add moisture during the cooking process. Because of the large cooking surface of the Masterbuilt gravity series grill/smoker, you can stand your whole chicken upright with a beer can inserted. Also, because of the large cooking grate, you can cook four or more beer can chickens in a Masterbuilt gravity series grill/smoker.
In this article, we will outline our process and give some tips and tricks for better results.
Note: most links in this article are Amazon.com Affiliate links, see Affiliate Disclosure, thank you.
What Is Beer Can Chicken?
Sometimes chicken can dry out as it cooks. You can steam the chicken from the inside by standing a whole chicken upright on a half-full can of beer.
This cooking process will provide lots of moisture while the steam provides even cooking. The steaming liquid can be straight beer or any combination of flavored liquid.
Preheating Your Masterbuilt Gravity Series for Beer Can Chicken
When preheating a Masterbuilt gravity series smoker for beer can chicken, set the smoker to 50 degrees higher than your intended cooking temperature. After the smoker reaches the set temperature, wait for five minutes, then reduce to your cooking temperature. This preheating technique will allow the smoker cook box to heat up, reducing temperature fluctuation ultimately.
We will preheat the smoker to 325 degrees in today’s cooking process. After the smoker reaches this temperature waiting for five to ten minutes will allow all parts of the smoker to preheat.
The five to ten-minute preheating time is the perfect amount of time to prepare your chicken. When you place the chicken in the smoker, start by lowering the temperature to 275 degrees.
Load the chicken as quickly as possible and close the smoker door. Once your smoker door is shut, the digital controller will promptly balance the temperature.

Masterbuilt 1050 Gravity Series is our favorite smoker/grill. The key points for this smoker are durability, size, and ease of use. Check out our review article for the 1050(link here) or the 560(link here). Also, we have a YouTube playlist for the 1050(playlist here) and the 560(playlist here).
Check out the price on Amazon.com
Preparing Your Beer Can Chicken for Smoking
Start preparing your chicken by trimming skin and fat, washing inside and out, drying the skin, then seasoning your chicken.
Preparing your chicken for beer can smoking is a simple process, as seen in the abovementioned step. However, there is a bit more detail for each of these steps that you need to know.
Get your kitchen scissors out and remove any loose skin or fat on the main cavity of the chicken. Removing this skin and fat keeps it out of your way and prevents burning. Leave the skin at the head end so you can use it to help seal the opening but remove any fat.
Rinse your chicken well with cold water on low flow. The last thing you want to do is splash chicken bacteria around your kitchen. The main goal is to remove any dirt, slime, or standing bacteria from your chicken.
Dry your chicken skin as much as possible with a paper towel. Dry skin will give you the best chance at crispy skin.
For the chicken, I like to use a seasoning binder that is fat based. Olive oil spray works well as a binder, but I prefer the taste of butter on my chicken. Rub the butter on the outside and inside of the chicken. Lightly sprinkle your seasoning mix on the inside of your chicken and then the outside.
Now you are ready to put your chicken in the smoker.
Tip: Reserve a tablespoon of seasoning mix to dust the chicken after the butter has melted in the smoker.
Putting Your Beer Can Chicken in Your Masterbuilt Gravity Series
Now that you have preheated your smoker and prepared your chicken, it is time to place it on the grate in the smoker. Take half a can of beer and place it in the center of the smoker. Try to avoid the edges of the grates.
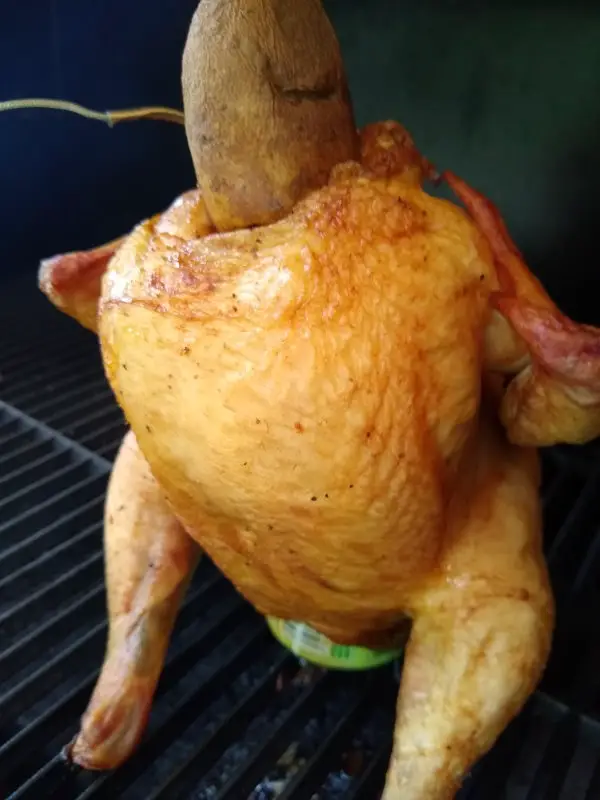
Place the chicken with the but side down and put your finger in the cavity so you can hold it open. Lift the chicken and slide it on top of the beer can. Push the chicken down until it rests evenly on the can and the grill grate.
Seal the top of the chicken. You can seal this opening in many ways. Some people use a small glass cup, while others stitch it closed with a string like a turkey. However, I like to use a potato, but first, I cut it to a small point shaped like the opening. Trim the potato as small as possible but still provide a good seal as it will be discarded when you are done cooking.
Keep in mind that there are many cheap beer can chicken racks that will increase stability and are budget-friendly. However, the more stable your smoker, the less your need a beer can rack. The Masterbuilt gravity series smokers are very stable.
Tip: Your beer works best at room temperature, so it can steam as soon as possible. Some people will preheat half a can of liquid for better results.
Cooking Your Beer Can Chicken
Cooking poultry is a balance of high enough heat for crispy skin, cooking slow enough for a smoky flavor, and bringing your internal temperature to 155 before a 15-minute rest. However, when you get all these right, you can get great smoked chicken with the added moisture from the beer can.
At this point, your chicken should be loaded in your smoker with the cooking temperature set to 275 degrees. If you prefer the skin to be more crispy, you might want to put your smoker to a higher temperature, like 325 degrees.
The heat from the smoker will cause the beer can to steam the inside of the chicken. The steam will do two things, cook from the inside and provide moisture for your chicken.
After thirty minutes, insert your probe thermometer into the thickest part of the chicken breast without hitting any bones. At the one-hour mark, check the chicken skin to ensure it is not drying out. We want crisp skin, but it can burn if it gets too crispy.
Basting the chicken with melted butter will give you a great taste, but olive oil spray is much easier. Lightly spray the chicken skin and add a light sprinkle of your reserved chicken seasoning mix.
An average size whole chicken should take about two hours to cook. I like to check the skin and the temperature every fifteen minutes.
Once your chicken reaches an internal temperature of 155 degrees, it will need to rest for 15 to 30 minutes to complete the cooking process. Wrap the chicken loosely in a large piece of foil and place it in a dry cooler or unused oven for that rest.
Tip: When removing the chicken from the smoker, try not to tip the can over because there should still be some liquid inside.
Highlights of Beer Can Chicken in The Masterbuilt Gravity Series
We covered all the details in this article, but it can help to clarify the main points for convenience.
- Preheat your Masterbuilt Gravity Series Smoker to 325 degrees, then lower your temperature to 275 when you load your chicken.
- Prepare your chicken by cleaning, trimming, drying, and seasoning your chicken.
- Load your chicken by placing a half-full beer can on the grill, then place the chicken on the can, don’t forget to plug the neck hole.
- Cook the chicken to 155 degrees internal temperature.
- Rest your chicken for at least 15 minutes.*
Conclusion:
Beer can chicken is possibly the juiciest smoked chicken you can prepare, and the Masterbuilt Gravity Series is an excellent smoker for the job. Following our directions will make this recipe and have great results.
However, after you have tried the basic recipe, you should customize the recipe to match your taste and desired consistency.