

Embarking on the assembly of the Oklahoma Joe’s Tahoma Smoker can feel like an adventure. This guide aims to navigate you through the twists and turns of putting it together.
From unpacking to the final screw, we have got your back with solutions to common setup hurdles. Whether you are a seasoned grill master or a novice, you’ll find valuable insights here.
So, grab your tools, and let’s tackle this together!
Unpacking and Initial Impressions
Unboxing the Tahoma Smoker feels like opening a Christmas present for BBQ lovers. The packaging impressively protected the smoker, ensuring it arrived without a dent or scratch. I was immediately struck by the solid build quality and heavy-duty components, promising durability.
As I looked through the instructions, I could tell a lot of thought went into every part, including Oklahoma Joe’s unique take on the auto-feed charcoal system.
However, the true test of the Oklahoma Joe’s Tahoma 900 lies ahead in its assembly and, more importantly, in its cooking performance.
Pioneer Smoke Houses full review of the Tahoma 900
Assembly Challenges of the Oklahoma Joe’s Tahoma 900 Smoker
As I dove into putting together the Oklahoma Joe’s Tahoma 900 Smoker, I hit a few snags. Now, it is possible some of these were just slip-ups on my part — maybe I missed a detail in the assembly diagrams.
Yet, I can’t shake the feeling that with a tad more clarity from the get-go, I might have sidestepped these hiccups altogether. So, let me walk you through these bumps in the road, aiming to smooth your path to a seamless assembly.
Bear in mind, from unboxing to final tweak, it took me about 4 hours to get everything shipshape. This included time spent correcting my missteps and fussing with my cameras to document the process. Working together and knowing the issues ahead of time, two people could likely assemble this in 2 hours.
Missing Hole in Axle
The Issue: One of the initial obstacles I came across was a missing hole in the axle, which is crucial for securing the wheels. The absence of this hole made it impossible to insert the cotter pin.
The Solution: I decided to resolve the problem myself. I carefully created the missing hole with a drill press and a metal cutting bit. This approach is straightforward, although it might seem daunting to those who don’t have these tools readily available.
Note: The missing hole seems to be an isolated incident, likely a slip in factory quality control rather than an issue with the assembly instructions.
Misorientation of Legs
The Confusion: The assembly manual’s vagueness led to a significant misstep: leg misorientation. The crux of the issue? Not realizing which leg went in which position, specifically the leg with three holes, which should face a specific direction.
The Clarification: After some head-scratching, the solution became clear. Disassemble and then reorient the legs correctly. Remember, the leg with three holes should be positioned towards the front of the smoker. A potential solution could involve placing label stickers on the parts for easier identification.
Back Panel Misalignment
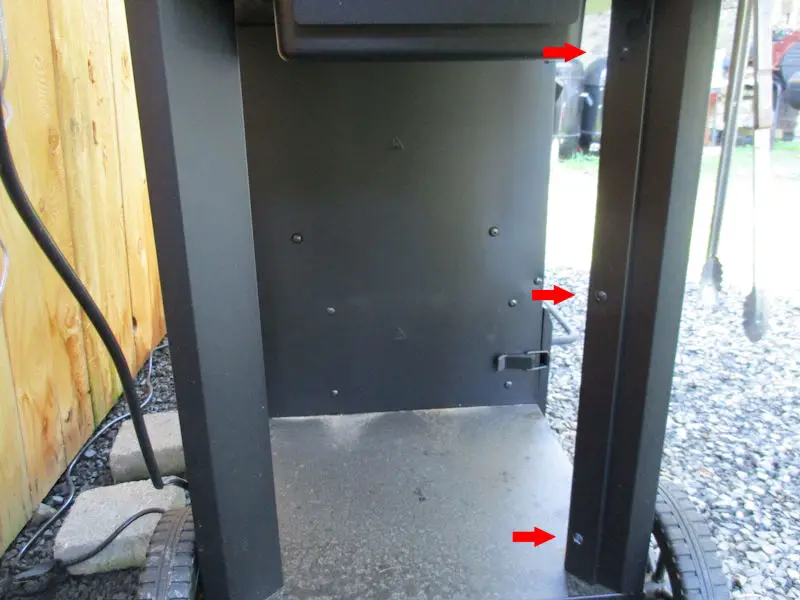
The Problem: The back panel did not fit tightly in the smoker’s frame. The screw holes are larger than the screw allowing for quite a bit of float in the panel. This design indicates a potential design issue or is an intentional design feature.
The Fix: Adjust the panel by loosening the screws on the panel and smoker body, realigning the panel for a perfect fit, then retightening the screws. When retightening the screws, snug each screw up so the panel and body can be aligned, then complete the tightening process.
Note: If the manual had instructions to leave the screws loose initially and tighten them only after attaching the smoker’s body, this issue could be effectively avoided.
Blower Assembly Wire Routing
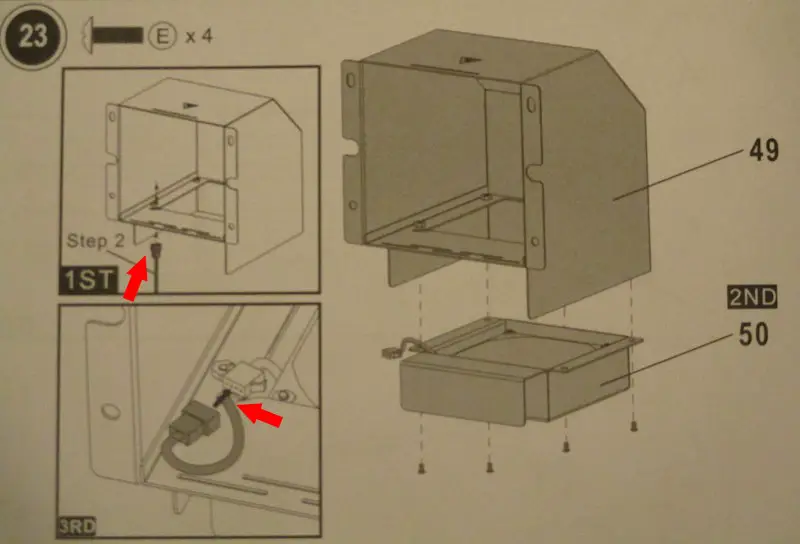
The Problem: Understanding the correct routing of the wire from the smoker’s base to the blower assembly was challenging due to the manual’s pictures not providing clear explanations.
The Instruction: Feed the wire from the smoker’s base into the blower assembly, ensuring it is correctly positioned before tightening and plugging it in. Install the fan as directed in the second step, making sure the wire enters the case before you finalize the installation or tighten the fan. It is essential to get the wire in place before securing the fan, a detail the manual overlooks.
Note: Assembling this part on the ground or a small block next to the smoker makes inserting the wire much easier, providing better access and visibility.
Hexagonal Openings for Screws
The Design Quirk: During the assembly, I encountered hexagonal screw openings for the wire chase on the hot side or the smoker. This design was not only unusual but also made aligning and securing screws confusing.
The Solution: To tackle these hexagonal openings effectively, I found that using a specific tool made a significant difference. Instead of struggling with a standard screwdriver, which might not provide the best grip or leverage, I recommend using a drill driver equipped with a magnetic bit. This allows you to use one hand to hold the wire chase while inserting the screws; final tightening should be done with a handheld screwdriver.
Note: This step is another spot where a second set of hands could make all the difference.
Grommet Installation Oversight
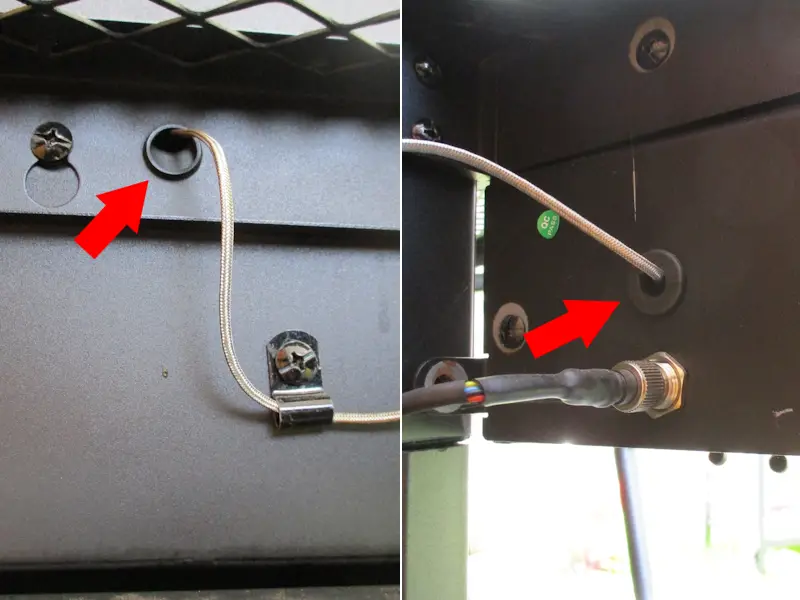
The Problem: The assembly guide at step 34 doesn’t clarify that the grommet should accompany the wire through the side shelf’s hole. Missing this detail could result in the grommet being overlooked, a realization that hit me as I was connecting the wire to the controller and noticed the grommet’s role in protecting the wire.
The Solution: Start by passing both the wire and the grommet through the shelf’s side hole before securing the shelf. After connecting the control panel connector, make sure to push it through the panel’s back hole followed by the grommet, checking that the grommet is fully seated and secure.
Key Insight: The grommet plays a critical role in protecting the wire against abrasion from the sharp edges of the access hole, particularly on the back of the control panel. This seemingly minor detail prevents wire damage and ensures the smoker’s safe and efficient operation.
Tips for a Smooth Assembly of the Oklahoma Joe’s Tahoma Smoker
Drawing from this assembly adventure, here are a few nuggets of wisdom:
- Organize Before You Assemble: Lay out all the pieces and familiarize yourself with them. A little prep goes a long way.
- Patience is a Virtue: Rushing leads to mistakes. Take your time, and don’t force parts together.
- Double-Check Your Work: Revisiting steps can catch errors before they spiral.
Final Thoughts
After assembling the Oklahoma Joe’s Tahoma Smoker and running initial tests, the results were impressive. The effort put into assembly pays off in the quality of smoked meats.
Assembling this smoker is a journey that tests patience but rewards it with superior smoking capabilities. I hope my insights make your assembly smoother and enhance your smoking experience.
To gain a more comprehensive grasp of the Oklahoma Joe’s Tahoma 900’s capabilities, I recommend exploring my thorough review. This analysis delves into the smoker’s characteristics, ease of use, and fulfillment of anticipated performance. Access the review through this link.
Author’s Remark:
With over four decades of passion for grilling and smoking under my belt, I have explored a range of smokers, including favorites such as the Weber Smokey Mountain and Char-Griller Offset Smoker. My extensive experience affords me a unique insight into the nuances of smoker assembly.
Moreover, I have compiled a collection of videos on YouTube showcasing my culinary journey with the Tahoma 900. From traditional recipes to innovative smoked cheese experiments, these clips reveal the smoker’s potential and the culinary delights it can produce. Also, you can check out my article on maintaining your smoker.
My aim with this detailed guide is to equip you with the knowledge to confidently assemble your Oklahoma Joe’s Tahoma 900, leading to numerous rewarding smoking adventures!