

Setting a PID controller for optimal performance with your Masterbuilt electric smoker is key to achieving precise temperature control. Once your Inkbird 106 PID controller is assembled and connected to your Masterbuilt smoker, the next crucial step is setting the PID.
Let’s dive into the essentials of getting it right from the start. This process is essential to ensure that the PID accurately maintains the desired temperature within your smoker, minimizing fluctuations and enhancing your smoking results.
Here’s how to set your PID controller using the basic settings to get great results immediately.
Note: most links in this article are Amazon.com Affiliate links, see Affiliate Disclosure, thank you.
Initial Setup for Fine-Tuning
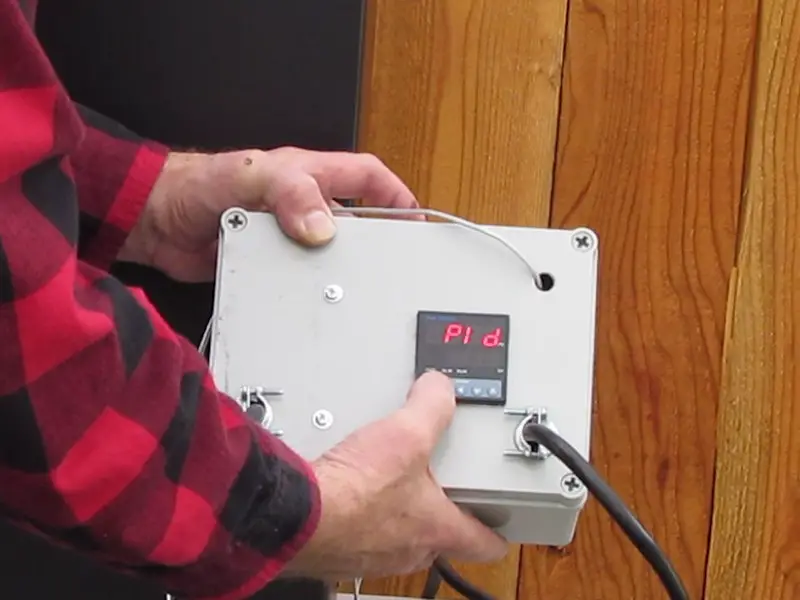
- Accessing the PID Settings: Begin by holding down the ‘set’ button on your Inkbird 106 PID controller for 3 seconds. This action will bring you to the settings menu, where you can adjust the PID’s parameters.
- Selecting the Control Mode: After accessing the settings, tap the ‘set’ button again until you reach the option labeled ‘control’. Use the left button to scroll through the options until you find ‘PID’. Selecting ‘PID’ mode is crucial as it enables the controller to use its Proportional, Integral, and Derivative functions to manage temperature precisely.
- Setting the Output to Heat: Next, ensure that the output is set to ‘heat’. This setting tells the PID controller that it should increase the temperature when the actual temperature is below the set point, which is essential for a smoker.
- Activating Automatic Control: Look for the option that allows you to set the controller to ‘auto’. This setting enables the PID to automatically adjust the power output to the smoker’s heating element based on the temperature readings from the thermocouple.
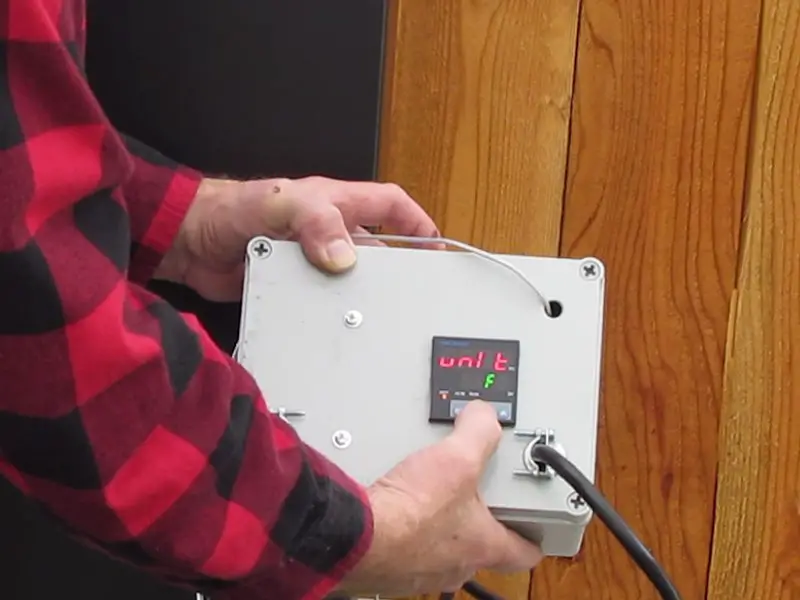
- Units: While we in the US use Fahrenheit, many countries use Celsius. The factory setting is Celsius, and changing this setting is completely optional. One of the last menu settings is UNITS. Simply go to this option and change it to F if you wish to use the PID in Fahrenheit mode.
Quick Tip: Precision in setting up your PID controller can transform your smoking experience, ensuring your Masterbuilt electric smoker maintains the desired temperature effortlessly.
Adjusting PID Parameters
- Lowering the Integral Time (I) to 1: The ‘I’ parameter helps the PID controller eliminate the residual steady-state error between the “set temperature” and the “actual temperature.” Lowering this to ‘1’ speeds up the adjustment process without causing too much overshoot.
- Lowering the Proportional Band (P) to 1: The ‘P’ parameter determines the controller’s response to the temperature difference. Lowering it to ‘1’ makes the PID more responsive to temperature changes, helping it react quickly to deviations from the set temperature.
- Setting the Derivative Time (D) to 540: The ‘D’ parameter controls the PID’s response to the rate of temperature change, helping to prevent the system from overshooting the set temperature. Adjusting this to ‘540’ provides a balance that mitigates overshoot while allowing for prompt temperature correction.
- Adjusting the Cycle Time to 200: The cycle time affects how frequently the PID controller adjusts the power output to the heating element. Setting this to ‘200’ ensures that adjustments are made with appropriate frequency, avoiding excessive fluctuations in temperature.
Remember, these settings are starting points based on my extensive smoking sessions. Each smoker and environment might require slight adjustments for perfection.
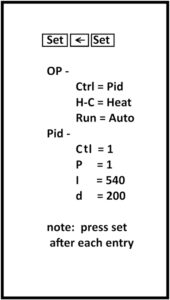
Quick Tip: Write a note like this one when programming key sequence devices. These step-by-step notes will prevent you from losing your place when programming any device.
Finalizing the Settings
After adjusting these parameters, your Inkbird 106 PID controller is finely tuned to manage the temperature of your Masterbuilt smoker more effectively. With these settings, you’re not just setting a PID controller; you’re elevating your Masterbuilt smoking game to a whole new level of consistency and flavor.
This fine-tuning process narrows the temperature range, preventing the temperature from exceeding the desired setpoint by significant margins, such as 20 degrees or more. By implementing these basic settings, you’ll achieve a level of control that enhances the consistency and quality of your smoked foods.
Remember, these settings are a starting point. Depending on your specific smoking conditions and preferences, further adjustments may be necessary. These adjustments will require a greater understanding on how a PID works.
Do not be afraid to experiment beyond these basics. Mastering your PID settings is a journey that enhances with each smoking session.
Understanding the Features of the Inkbird 106 Pid for Perfect Smoking
Inkbird PIDs have a range of different features that can all be set in many ways. When you start experimenting with these settings, it helps to have an understanding of the PID and what it is capable of. This section covers details about the features and what effects they have on temperature control.
Advanced PID Tuning Techniques
- Dual-Phase Tuning Approach: Start with a broad tuning to get within the general vicinity of your target temperature quickly. Then, apply finer adjustments to dial in the precise control as you approach the setpoint. This method reduces the overall time it takes to stabilize the temperature and can be particularly useful during the initial heating phase.
- Seasonal Adjustments: Be mindful of the changes in ambient temperature and humidity throughout the year. You may find that a setting that works perfectly in the summer doesn’t hold up in the colder months. Keeping a log of settings and their effectiveness across different conditions can help you create a reference for future adjustments.
- Understanding the ‘I’ and ‘D’ in PID: While the ‘P’ (Proportional) setting is crucial for immediate responses to temperature deviations, the ‘I’ (Integral) and ‘D’ (Derivative) settings play a significant role in stabilizing temperature over time. The ‘I’ setting helps eliminate residual steady-state errors by integrating past temperature deviations, whereas the ‘D’ setting predicts future temperature deviations. Experimenting with these can help you smooth out temperature fluctuations and anticipate changes before they happen.
Leveraging Inkbird 106 Features for Smoker Control
- Ramp/Soak Feature: Some PID controllers, including certain models of Inkbird, offer ramp/soak capabilities. This feature allows you to program a gradual temperature increase (ramp) and then maintain a specific temperature for a set period (soak). Utilizing this feature can be particularly useful for recipes that require a slow temperature increase, followed by a steady cooking phase.
- Alarm Functions: Use the Inkbird 106’s alarm functions to alert you when temperatures exceed or drop below your set thresholds. This feature can act as a failsafe, ensuring you’re promptly informed of any issues before they impact your smoking process.
- Calibration: Ensure your Inkbird 106 is accurately calibrated with the actual temperature inside your smoker. Discrepancies between the controller’s reading and the actual temperature can lead to inconsistent results. Regularly check the calibration using a separate, reliable thermometer and adjust the PID settings as necessary.
Continuous Learning and Adaptation
- Feedback Loop: The essence of PID control is its feedback loop. Continuously monitor the performance of your smoking sessions, noting any temperature overshoots or lags. Use this feedback to iteratively adjust the PID settings, honing in on the optimal configuration for your specific smoker and cooking style.
- Community Insights: Engage with online forums and communities focused on smoking and PID controllers. Many users share their settings and experiences, which can provide valuable insights and shortcuts to achieving better temperature control with your Inkbird 106.
Final Thoughts
Mastering the art of PID tuning and leveraging the advanced features of the Inkbird 106 can significantly elevate your smoking game, offering unparalleled precision and consistency in temperature control. By embracing a mindset of continuous learning and adaptation, you unlock the full potential of your electric smoker, ensuring each smoking session is better than the last.
The journey from basic setup to advanced tuning is about following steps and understanding the intricate dance between heat, smoke, and time. Engaging with the community and experimenting with your settings will not only improve your skills but also deepen your appreciation for the craft of smoking.
Ultimately, the path to becoming a pitmaster is paved with patience, practice, and a willingness to learn from every smoke.