

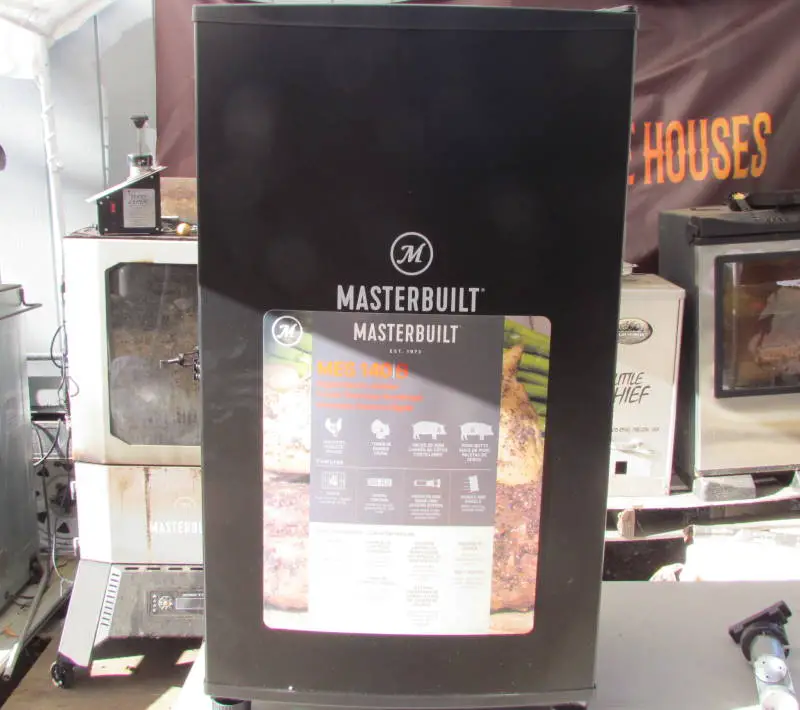
Are you eager to learn how to use a Masterbuilt Electric Smoker? you’re in the right place. The Masterbuilt 40-inch electric smokers offer a user-friendly and reliable option for beginners and seasoned enthusiasts exploring the art of smoking food.
In this comprehensive guide, I will unravel the basics of operating a Masterbuilt electric smoker, coupled with some insider tips to elevate your smoking experience. Whether you’re a novice or a seasoned enthusiast, stick around to discover the ins and outs of using a Masterbuilt Electric Smoker like a pro!
And hey, if you want to dive into a detailed review of this model, check it out here (Review of Masterbuilt Electric Smoker)
Note: most links in this article are Amazon.com Affiliate links, see Affiliate Disclosure, thank you.
I’m Robert Cole, the founder of Pioneer Smoke Houses. My journey into smoking began as a family tradition of camping and enjoying fresh smoked fish. As my expertise in smoking grew, I also experimented with modifications to budget-friendly smokers.
At that point, I had turned a corner and switched to smoked barbecue. I soon had a deep passion for all things smoked. Over the years, this passion has turned into a mission: to share my knowledge and experience with others.
Through Pioneer Smoke Houses, I offer detailed reviews, tips, and guides on smoking. Whether you’re just starting out or you’re a seasoned enthusiast looking to refine your skills, I’m here to help you elevate your outdoor cooking experience. My goal is to make smoking and grilling accessible and enjoyable for everyone.
Key Information Overview: Masterbuilt Electric Smoker Guide
| Aspect | Key Information |
| Basic Operation | – Turn on/off the unit. – Set temperature and time using the control panel. – Add wood chips through the loading tube. – Place food for smoking. |
| Seasoning the Electric Smoker | – Spray inside with vegetable oil. – Run the smoker at the highest setting with wood chips for 2 hours. – repeat after long storage periods or cooking strong foods. |
| Preparing and Loading the Smoker | – Use a foil drip pan to catch drippings. – Preheat the smoker for an hour before cooking. – loaded 1/4 cup of wood chips during preheating. |
| Top Species of Wood Chips for Foods | – Pair strong wood types with strong meats or foods. – Examples are beef, which matches well with mesquite, and fish, which pairs well with apple. |
| Tips for Loading and Cooking Meat | – For quick loading place food on grill mats. – Load the food on the second shelf from the top for the best flavor and even heat. – Using a separate wired or wireless temperature probe monitors smoker and meat temperature. |
| Accessories and Enhancements | – Top Accessories include an outdoor-friendly cover and smoker stand or leg kit. – A smoke generator can increase the capabilities of the smoker and reduce wood chip loading maintenance. |
| Tips and Tricks for Optimal Performance | – Add wood chips every 45 minutes – load slightly more than 1/2 cup of wood chips per load – never soak wood chips in an electric smoker – fill water pans with hot water only – for better smoke, use a smoke generator of pellet smoking tray |
| Summary and Conclusion | – Recap the essential steps for using the Masterbuilt Electric Smoker. – Encouragement to explore smoking techniques and flavors. |
From basic operations to advanced tips and tricks, this table offers a concise overview of key information contained in this article.
This information can improve results for both beginners and experienced users.
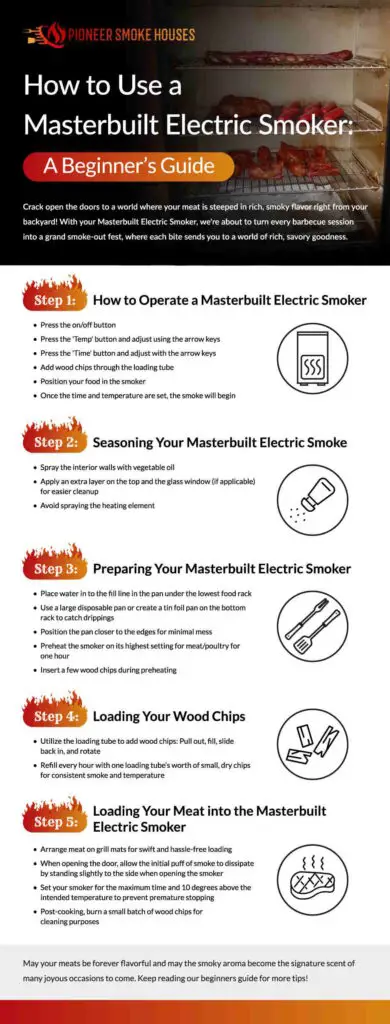
How to operate a Masterbuilt Electric Smoker
The basic operation of the electric smoker is as simple as pushing a few buttons.
- Turn the unit on by pressing the on/off button.
- Set the temperature by pressing the Temp button, then use the arrow keys to raise or lower.
- Set the Time by pressing the Time button, then use the arrow keys to raise or lower.
- Add wood chips through the loading tube.
- Add your food for smoking.
Once the time and temperature are set, the smoke will turn on.
2 Essential Tips for Using a Masterbuilt Electric Smoker:
- Always set the time well over your intended cooking time and manually turn off the smoker when done.
- Set the smoker 10 degrees higher; after it is smoking well, lower the temperature setting to the cooking temperature.
Seasoning your electric smoker
First, before you cook in your electric smoker, you need a good dry run to Season your Masterbuilt Smoker. To season your smoker, lightly spray the inside with vegetable spray. Add a second coat of spray to the top and glass window (if your model has one) for easy cleanup. Take care not to spray the heating element.
Run the electric smoker on the highest setting for two hours with a full tray of wood chips. When you go to cook in your Masterbuilt electric smoker for the first time, you will be rewarded for this effort with yummy tasting smoked meat.
Comprehensive Checklist for Seasoning Before Using Your Masterbuilt Electric Smoker
- spray the inside of the smoker with vegetable oil
- add a second coat of spray to the inside roof and window
- run two hours on the highest setting
- add one tray of wood chips
- finally, smoke something greasy like a small pork shoulder
Here is our video, Seasoning a Masterbuilt 140B Electric Smoker.
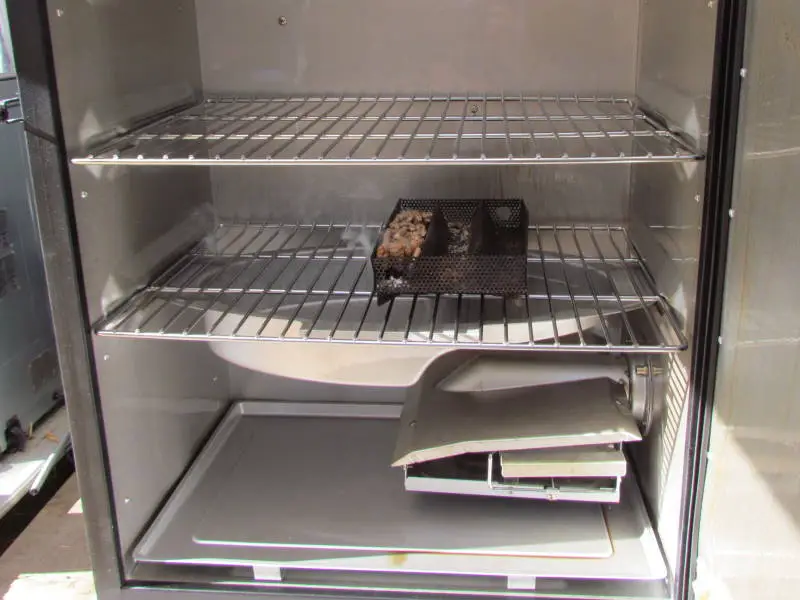
Preparing your smoker
It is always a good idea to load water into your smoker when you are cooking in it. I put water in the main grease tray, which I don’t use to collect grease. Then, I put it in a large disposable pan or make a tin foil pan on the bottom rack to catch the dripping. The closer to the edges you place the tin foil pan, the less mess you will have.
Preheating your electric smoker is a must; this smoker needs more time than a propane smoker. Put your electric smoker on the highest setting for meat or poultry and let it run for an hour before putting in food. Also, when preheating, put a few woodchips in, as instructed in the next section.
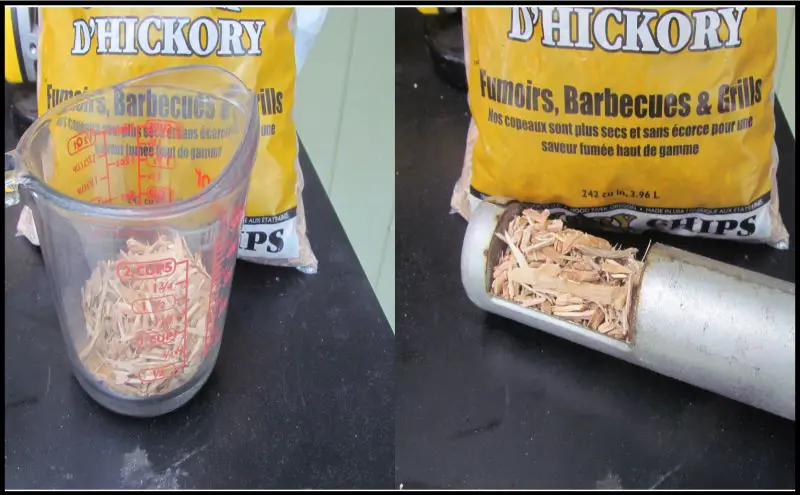
Optimal Wood Chip Loading for Your Masterbuilt Electric Smoker
By far, one of my favorite features of the Masterbuilt electric smoker is how you load the wood chips. The smoker has a loading tube with a handle. You turn the tube and pull it out of the smoker, fill it with chips, then slide it back in and turn it to fill the tray.
You can fill the loading tube twice to fill the tray completely, but I recommend not overfilling it as it will reduce the smoke output. As you are running your electric smoker, put one load of chips in each hour to keep constant smoke and even temperatures. Also, always use small wood chips with this smoker because if you do not, it will not smoke well, and never soak your wood chips. We will talk more about these subjects in the tips below.
Top Species for Different Foods
Here is a short list of common wood pairings for different foods. We have a complete article that will explain what goes together well. Remember that you don’t need to add smoke during the entire process, so a strong wood like mesquite could work with any smoked meat in moderation.
- Mesquite – beef or dark meat chicken
- Hickory – bacon of fatty pork
- Oak – beef steaks, ribs, or small roasts
- Apple – fish, lean pork, or cheese
- Cherry – fish
- Pecan – everything and whole chicken
Loading your meat
I arrange my meat on grill mats for fast and easy loading before opening the smoker. When you open the smoker, stand to the side a bit and let that first puff of smoke dissipate so you can breathe while loading. You can check out a grill mat at Amazon.com.
Slide your food onto the racks as quickly as possible, starting with the top rack when cooking meats and poultry. Use the lowest rack first when cooking fish. The temperature will be higher at the top of your smoker, so arrange thicker cuts on upper shelves and thin ones on lower shelves.
If Your smoker has a built-in wired temperature probe that you can insert into the middle of the thickest piece of meat to check its progress. I am a fan of using a separate probe thermometer because I think they are more accurate, but if you use a wired probe, try running it out the bottom of the door to avoid damaging the seal.
Note: The Masterbuilt smoker is great at smoking meat, but some meats perform better than others. I avoid poultry in this smoker unless it is for a pre-smoke at the maximum temperature of 270 degrees Fahrenheit. Then, I sear my chicken on a propane grill or charcoal grill. This process also works great for steaks and pork chops.
Setting your smoker
Set your smoker for the maximum time and 10 degrees over the desired temperature; you never want your smoker to stop early. It is good to burn a small batch of wood chips to clean out your smoker when you are done cooking. Setting the temperature is better to error over just a bit, so your food is cooked completely. If your food is done cooking early, you can rest it in your oven or a clean cooler.
Click here to see the price on Amazon.com
Accessories
Cover
A custom-fit cover is always a good investment, especially if you keep your smoker in an uncovered area outdoors. Masterbuilt smoker covers will help keep the weather and bugs out of your smoker. (click here to see this item on Amazon.com) Aftermarket covers are available at lower prices but are not always an exact fit.
Stand
A Masterbuilt smoker stand can be a great accessory to help avoid a sore back. All of the mechanical parts of your electric smoker are located near the bottom of your smoker, so everything from loading wood chips to emptying your trays will have you on your knees. You could improvise with a metal table or something durable, but it would not be a custom matching piece. (Here is a link to the Masterbuilt leg kit on Amazon.com)
I like a basic metal dining cart that I purchased on Amazon.com. These carts are lightweight, easy to move, fire resistant, and include hanging accessories. You can check my recent YouTube videos to see me using the dining cart.
Smoke generator
Masterbuilt smoke generator is the best of the best accessory for their electric smoker line. The one shortcoming of the Masterbuilt electric smoker line is that they are not overly smokey, but one of these units makes up for that by kicking loads of smoke into the smoker.
The smoke generator was made as a cold smoker device, but I have found that it can take your smoker to the next level. These units can be hard to find, but there are many other brands available on Amazon.com.(click here to see an option)
Click here for our article How to Smoke a Brisket in a Masterbuilt Smoker
Masterbuilt electric smoker tips and tricks
In this section, we will cover some tips that will make your learning curve smooth and answer a few questions along the way. Also, we will go into greater detail on some topics that we have covered in the how-to section.
Keep in mind that most of these Masterbuilt electric smoker tips and tricks are not limited to just Masterbuilt smokers but can be a how to use an electric smoker of any brand.
How often to add wood chips to a Masterbuilt electric smoker?
I have seen many incorrect answers on the internet, but between talking to other expert users and my live tests, adding ½ cup of wood chips to your Masterbuilt electric smoker every 45 minutes should be perfect. However, letting your smoker go one hour between refills is okay to get a complete burn.
If you are running your smoker at temperatures above 250 degrees fahrenheit, it is possible to burn wood chips faster, so for the first few hours, check for smoke every thirty minutes.
Because of the design of the chip tray and heating element, you should never overload your wood chips, or you will not get constant smoke and heat. Always use small chips and not large chunk-type wood. The large type is hard to light and can jam the loading tube.
Note: most electric smokers burn wood chips at a similar rate regardless of the brand because they try to smolder and not catch fire to produce the smoke. So, how often to add wood chips to an electric smoker? You should add wood chips every 45 minutes to your electric smoker.
How much wood chips for the Masterbuilt electric smoker?
Most Masterbuilt tube load electric smokers take about 1/2 cup of wood chips per load. The amount of wood chips can vary from model to model, but you can easily add more ahead of schedule if you underload it just a bit.
When you set up a burn test preheated and to run the element continuously 1/2 cup of wood chips burn in just under 20 minutes. However, for a typical cook, the element will go on and off several times, yielding about 30 minutes of smoke. The MES140b has a wood chip capacity of 3/4 cup, which can last 45 minutes during normal cooking.
For pan-load electric smokers, we typically see full pans take around 1 cup of wood chips. The amount of wood chips is directly related to the total smoke time. For example, 1/2 cup of wood chips takes 30 to 45 minutes to finish smoking, while 1 cup takes 45 to 60 minutes.
Do you soak wood chips for the Masterbuilt electric smoker?
Do not soak your wood chips because most electric smokers do not perform well with soaked wood chips unless the element runs very hot. Electric smokers are designed to get just hot enough to burn dry chips at a slow, steady rate to give you an even smoke.
Additionally, we recommend never soaking wood for any type of smoker because it will not burn clean. As the wood chips start to heat, they will steam before smoldering and releasing dirty smoke.
How do I add water to the Masterbuilt electric smoker water pan?
On the lower tray of your smoker is a removable drip tray/water pan that slides out to empty and fill. If you fill this halfway with hot water, the humidity in your smoke should stay at a level to keep your meat nice and juicy.
I put water (or cooking liquid like chicken or beef stock for smoked gravy) in my homemade drip tray on the bottom rack. A splash of water in each tray can help with cleanup as it can keep juices from baking onto the trays.
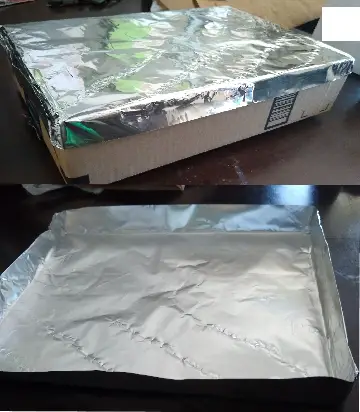
How do I make a disposable drip tray?
Take a pan or a box that fits in your smoker on the bottom rack, and there should be no more than a half-inch gap around the sides. Next, you take a large piece of foil and form a pan over the bottom of the box. Carefully fold or roll up the corners so your foil pan will keep its shape.
If you are lucky, you can find some disposable trays at the dollar store or check out this Amazon affiliate link. Try not to overthink the drip tray because this is a tool to make your life easy with quick cleanup and is unnecessary for good food.
How do I clean my Masterbuilt electric smoker?
Cleaning a smoker should be limited to loose debris, grease, ashes, and pan drippings. You never want to remove your smoker seasoning, which imparts that wonderful smoked flavors to all your meats.
I start by running my smoker with a pan full of hot water to steam the inside of the unit. Then, using a clean rag (old t-shirt), wipe down all the racks and remove them as I go.
Next, I wipe the inside top and down the side walls to remove the debris and grease. The trays near the bottom should be catching anything that falls so you can pull them out and dump them into your garbage. Continue wiping the remaining surfaces, including the door’s inside and the door seal.
I don’t recommend any cleaners, but if I were going to use a cleaner, it would be a citrus-based food-safe cleaner like Simple Orange. A light mist of citrus cleaner will not leave a chemical smell in your smoker. If you don’t like the orange smell, you can re-season your smoker in just a few hours of operation.
Finally, it would help to wipe out your wood chip tray each time before preheating your smoker for the best results. Any ashes or used wood debris can reduce the amount of smoke this unit will produce.
Click here to read our roundup of Masterbuilt smokers
My Masterbuilt electric smoker is not smoking?
The Masterbuilt electric smoker is not a high smoke unit. Electric smokers’ main appeal is their ease of operation over charcoal or propane smokers. We can do a few things to help. There are even ways to improvise that will improve your smokers’ output.
First, before we modify anything, always double-check that the wood chip tray is clean each time you use your smoker. Fill the wood chip tray halfway with chips and wait for it to start smoking before beginning the normal chip loading process.
The power cord or extension cord can be an issue that you should check before trying the tricks. Check your power cord to make sure it is in good shape, has no rust, and is not melted or cut. Then plug it into a known good outlet to do a short test, but don’t run the smoker indoors!
Crush a few pieces of charcoal into four chunks, and put a few chunks into the tray before you start. Then, add one chunk of charcoal each time you load chips into your smoker. The burning temperature will increase and add a nice charcoal flavor by adding charcoal.
Run your smoker above 200 degrees fahrenheit because the thermostat will turn the heating element off when it reaches the temperature setting. At this point, your chips will stop burning. Due to how the thermostat works, this smoker would be a very poor choice for cold smoking, but we can fix that.
There are many ways to add smoke to your unit: a factory smoke generator, an Amazin’ smoke tray(link to Amazon.com here), or even an external burner tray modification. The Masterbuilt smoke generator is by far the easiest way to go and will provide the best experience.
The smoke generator is easy to set up. It slides into the chip loading tube and pumps massive amounts of smoke into your unit. The one downside to the smoke generator is that you will need to add an extension tube to drop the smoke temperature if you plan on cold smoking.
My favorite device for all-around ease of use is tray Amazin’ smoke tray. You load the tray with pellets of your choice, light the corner with a torch, and put it on the bottom tray of your smoker.
It works best to remove the loading tube from your smoker so there is enough oxygen for a good burn. Another advantage to this item is that you can use your smoke element to control cooking temperatures and not worry about burning wood chips.
The Amazin’ smoke tray advertises that it will burn for up to sixteen hours. In my experience, this claim is a bit inflated. That being said, I have been able to get a solid twelve hours of quality smoke, which is still quite impressive.
This tray is versatile and can also make a great addition to your gas grill. I often use the tray in my gas grill to add a little smoke flavoring to everything from salmon to pork. (click here to check this out on Amazon.com)
Lastly, you can put a single burner (hot plate) at the bottom of your smoker, or better yet, attach a ventilation pipe to the side of your smoker. This will allow you to use the pan smoker method, which is very reliable and controllable. Being able to customize your pan type and temperature allows you to burn any smoking medium, including pellets, chips, chunks, or charcoal. You can even take it camping with a small propane burner, making it easy to smoke fresh fish or steak in the great outdoors.
For more information, check out our article Why is My Masterbuilt Smoker not Smoking
Summary
Now that you have grasped the essentials of how to use a Masterbuilt Electric Smoker, it is time to turn your culinary visions into smoky masterpieces. Whether you are a novice or a seasoned enthusiast, this guide has equipped you with the knowledge to maximize your smoking experience.
Dive into the world of flavor, fire up your Masterbuilt Electric Smoker, and let the sizzling journey begin. Happy smoking!
If you would like to read our review of this smoker click here to check it out.
Check this smoker out right now on Amazon.com click here
FAQ:
How do you use the electric Masterbuilt smoker?
Using a Masterbuilt electric smoker is a simple process that will start with preheating the smoker to the cooking temperature for 30 minutes. Next, add wood chips to the wood chip tray, and this process can vary depending on the model. Add food to the smoker as soon as you start to see smoke. Check the time on the smoker and add two hours more than the process requires so the smoker doesn’t turn off before the food is done. Finally, add wood chips during the process once an hour and try not to over-smoke the food when first learning.
How do you use a Masterbuilt electric smoker for the first time?
The first use of a smoker should always start with good seasoning. Run the smoker at 250 degrees for at least 2 hours with constant smoke. Let the smoke cool entirely, then smoke something fatty like a small pork shoulder or roast. After the first cook is done, run the smoker empty for another hour to complete the seasoning.
Do you soak wood chips for Masterbuilt electric smokers?
Never soak woodchips for smokers! For a wood chip to smoke, it must burn slowly and be dry for that to happen. If your wood chips are wet, they release steam before they smoke. Often other brands of electric smokers that run at lower temperatures will not smoke for hours if the wood chips are soaked.
How often do you add wood chips to a Masterbuilt electric smoker?
Adding wood chips every 45 minutes should be perfect for most Masterbuilt electric smokers, but I often go once an hour. Electric smokers vary on woodchip pan capacity, and Masterbuilt smokers tend to be the smallest. Also, if you are running the smoker at the maximum temperature, check it at 30-minute intervals during the first two hours.
How do I find the user manual for a Masterbuilt 20070712 electric smoker?
User manuals for out of productions smokers can be hard to find, so we recommend looking at parts supplier’s websites. An example is the Masterbuilt analog electric smoker 20070712 has been replaced with the 20070210, but you can still find the manual on the Appliance Factory Parts website. Of course, the reason you can find the manual here is so they can sell you the correct part for your older electric smoker.